

The duck dive is an essential technique — and yet many beginner and intermediate surfers struggle with it. Are you wondering how you can improve your duck dive? Do you feel scared when the waves get bigger because you know that without this technique, it will be hard to get into the line-up? Or maybe your duck dive is so ineffective that your board often gets ripped from your hands. Washing machine guaranteed — maybe even a dislocated shoulder or a board to the face.
This Duck Dive Guide is packed with useful tips to help you get under the waves more easily in the future.
The duck dive can only truly be learned in the ocean. It’s not just about executing the movement correctly — it’s about understanding the dynamics of water. BUT: You can and should practice the movements as often as possible in a lake, river, or large pool to build the muscle memory. Pro tip: If you have a GoPro or a waterproof phone/camera, film yourself while practicing. Nothing helps you improve faster than watching yourself on video.
Before we dive into mental technique training, here are a few general tips to help you learn to duck dive effectively:
The Duck Dive Basics:
To be able to duck dive, a few key requirements must be met:
- The right board: You must be able to push your board underwater. Boards with too much volume relative to your body weight will be difficult to sink. Advanced surfers can manage duck dives even with larger boards, but as a learner, you need a board you can handle.
- The right conditions: Start practicing in small waves. Trying to duck dive in bigger surf too early will likely result in a good tumble. If you don’t dive deep enough under the wave, the board will get ripped from your hands.
- Patience: The technique is challenging and takes time. Most surfers need a while to master it.
- Knowledge: Watch multiple duck dive video tutorials. Understanding what’s happening underwater is essential.
Learning to Duck Dive – The 5 Steps:
Pre-Exercise in Calm Water (Lake, Pool, or Calm Sea):
Try to push your board underwater. Grab the rails at chest height and shift your weight over your shoulders to push the nose down. Once the nose sinks, place one foot on the tail and push it down too. Try to hold your balance in this position for a few seconds.
Step 1 – Speed: Speed builds momentum. Paddle toward the wave as fast as you can.
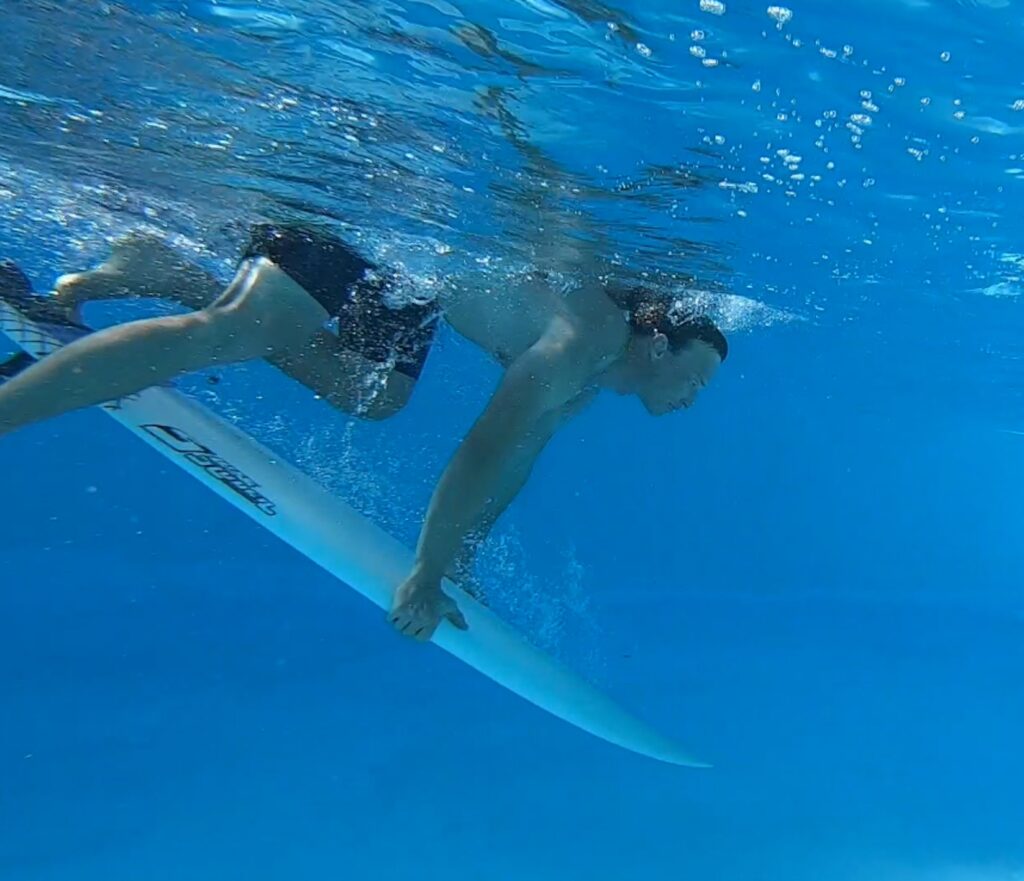
Step 2 – pushing the nose underwater: Timing is key. Start the duck dive about 2–3 meters in front of the wave (about one board length or a bit more). Grab the rails at chest height, shift your weight over your shoulders, and push the nose underwater with outstretched arms. Before diving, take a breath — ideally through your nose — to fill your lungs with just enough air (but not too much, to avoid excess pressure).
Step 3 – press on the tail: Almost simultaneously, place your foot (usually the one attached to the leash) on the tail. As the nose sinks, apply pressure on the tail and kick your other leg up — like a scorpion’s tail. The goal is to bring the board into a horizontal position underneath the wave.
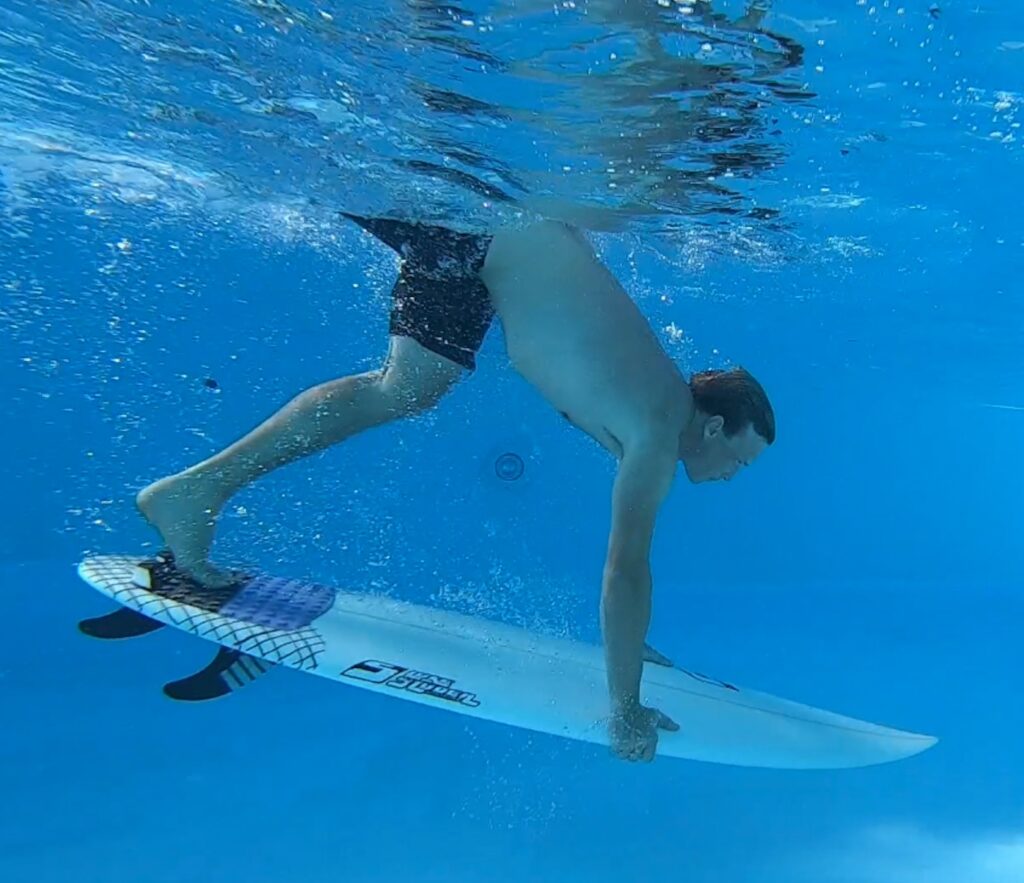
Step 4 – Bring your body to the board: To dive deep enough, bring your body to the board — don’t pull the board toward you. You’re essentially diving after your board, like when diving under a wave without a board. The wave’s motion will pull you upward once you pass under it.
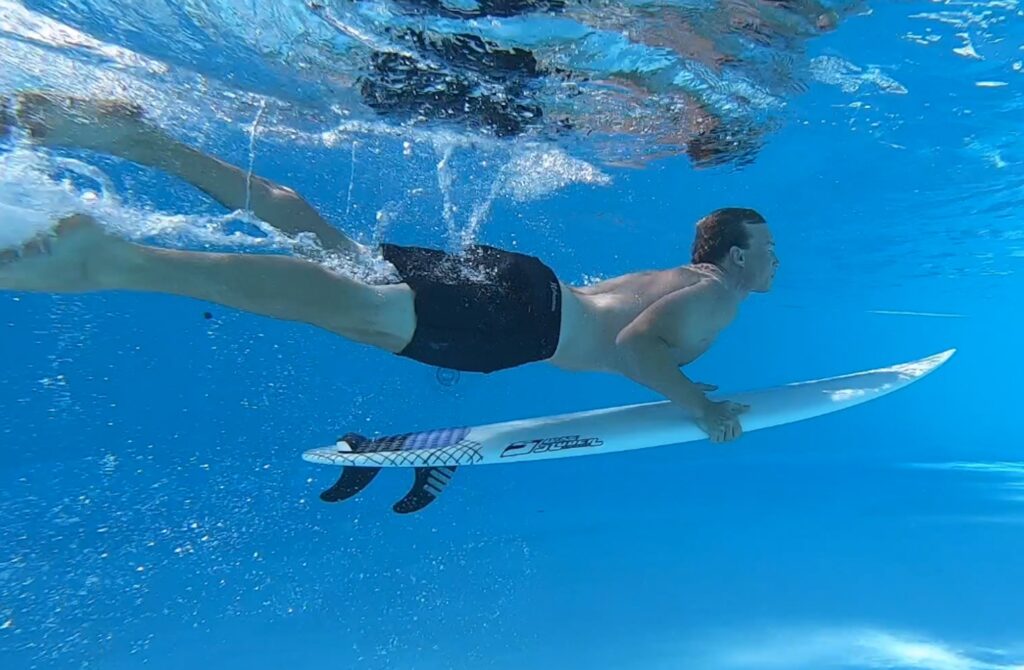
Step 5 – Surface: Look up toward the sky and exhale as you rise. Kick with your legs to speed up your ascent. As soon as you surface behind the wave, continue paddling.
The Most Common Mistakes When Duck Diving:
Weight too far back: With our retreat participants, I often see t keeping their weight at the rear when pushing the board down. This makes the duck dive unstable and ineffective and it’s almost impossible to sink the nose. You need your weight over your shoulders to sink the nose first. Don’t press down the tail down, but sink the nose first.
Arms not extended: Make sure your arms are straight when sinking the nose.
Weight stuck at the front: While getting your weight forward to sink the nose is a good first step, you also need to shift it to the tail to complete the dive. If all your weight stays in the front, you’ll lose balance and fail to sink the tail.
Weak tail pressure and kick: The push on the tail and the upward kick must be strong and dynamic. It’s a powerful movement! Not hectic, but committed.
No diving motion: When we practice the duck dive at our intermediate surf coaching retreats, the participants manage to sink both the nose and tail but don’t actually dive under the wave. This can be due to weak tail pressure or not bringing the body down to follow the board or not having enough speed or bad timing. It’s hard to describe, but hopefully you get the idea!
Learn the Duck Dive Faster with Mental Training:
Learning to duck dive is difficult — but the good news is: you can accelerate your learning curve with mental technique training!
In the video below, I’ll guide you through a mental training exercise you can do at home. But first, let’s look at how mental training actually works.
Mental Technique Training Explained:
In short: It’s a method where you break down a movement into phases, assign keywords to each phase/key moment, and practice the sequence both physically and through visualization. The goal is to anchor and automate the movement pattern or to retrain it when you want to change a bad movement habit.
The steps:
Step 1:
Recall and describe how you currently duck dive. Say it out loud like you’re explaining it to someone.
Step 2:
Write out the movement sequence from your description — this becomes your personal movement script. Make sure to use positive phrasing. (Example: Instead of “I must NOT start descending too late,” say: “I start diving at least one board length before the wave.”)
Watch duck dive tutorials on YouTube, pay close attention, and revise your script if needed. Ideally, show it to a surf coach to make sure the sequence is correct and that you’re not practicing the wrong movement. This will also help you identify parts of the duck dive you haven’t fully understood yet. Your description should include the movement sequence, as well as your thoughts and feelings — anything that comes to mind.
Read through your corrected script until you can recite it by heart.
Step 3:
Shorten your script to the essentials and memorize it — fluently and effortlessly without having to think about it. Then practice with the duck dive exercise from the video.
Step 4:
Break the movement into clear phases (example in video).
Step 5:
Assign each phase a keyword. Could be a word or sound (e.g. woosh, bam, etc.). Visualize the phases while saying the keywords. Then repeat the duck dive exercise using these cues. You’ll find an example in the video.
That’s the magic! Practice daily for several weeks to make it a movement habit. Always warm up and avoid overtraining — especially the chest muscles.
Video in German:
Video in English:
Would you like online coaching to create a personalized mental training plan? Or do you have a mental block — such as fear or low self-confidence — that’s holding you back in your surfing?
Book your session directly through my Calendly calendar, or learn more about my offerings HERE.
Prefer to train directly at the sea? Then explore our Surf Coaching & Mental Training Retreats – get the full experience in an empowering environment! Find an overwiew of our retreats and training weeks HERE.
Good Youtube Tutorials to learn how to duck dive:
Barefoot Surf: How to duck dive – Surfing tutorial to pass the break efficiently
Recent Comments